
Spring is upon us, which means it’s riding season! Time to take your motorcycle out of storage and ride! But wait…not so fast. You can’t just unhook the battery tender, start ‘er up and ride away. After months of sitting, even under cover and prepped for storage, your moto needs a little extra attention before you hit the road. The brief investment in time is worth it in terms of safety and keeping your moto in tip-top shape.
Check the tires
Tools required:
- Tire pressure gauge
- Tire pump/air compressor
- A penny
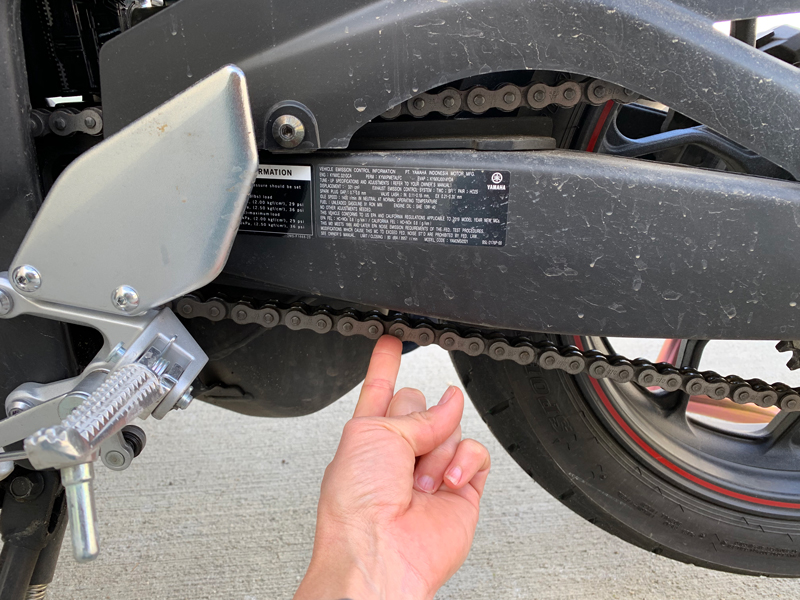
After sitting for a while, especially as temperatures dropped…then rose a bit…then dropped again…you get the picture…your tire pressure has likely gone down. Check both tires and, if necessary, fill to the recommended cold psi as displayed on the bike’s swingarm (see photo below).

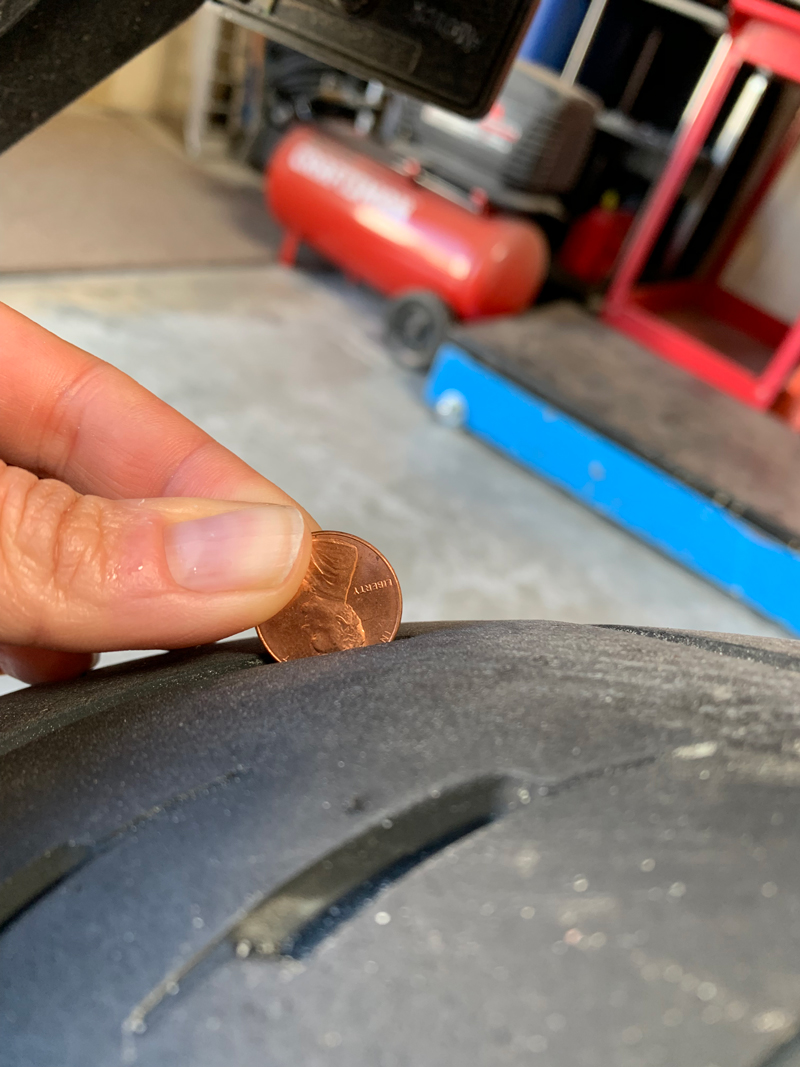
While you’re down there, inspect those sidewalls and the tread for cracks, and make sure there’s plenty of tread remaining. A classic guideline is to slip a penny into the center tread groove with ol’ Abe Lincoln head-down. If you can see ALL of his head, it’s time for a new tire.
Check/charge the battery
Tools required:
- Philips head screwdriver
- Wrenches/hex heads as required to access the battery
- Battery tender
- Bonus points: multimeter
Hopefully you remembered to either remove the battery and bring it inside to charge, or you hooked up the battery tender to the bike when you put it away for the winter. If so, a quick once-over should be all that’s required; look for corrosion around the terminal posts and evidence of leaks. If the battery is more than a few years old, check it with a multimeter once you’ve disconnected it from the tender to make sure it’s still holding a charge.
If you forgot, no biggie, you just might not be riding today. Hook up the tender and finish the rest of this list; once it’s charged, you’re ready to go!
Inspect the chain (*see alternative steps below for belt-and shaft-driven bikes)
Tools required:
- Motorcycle chain cleaner or kerosene
- Clean shop rags
- Motorcycle chain lube
- Bonus points: chain cleaning brush, centerstand or paddock stand
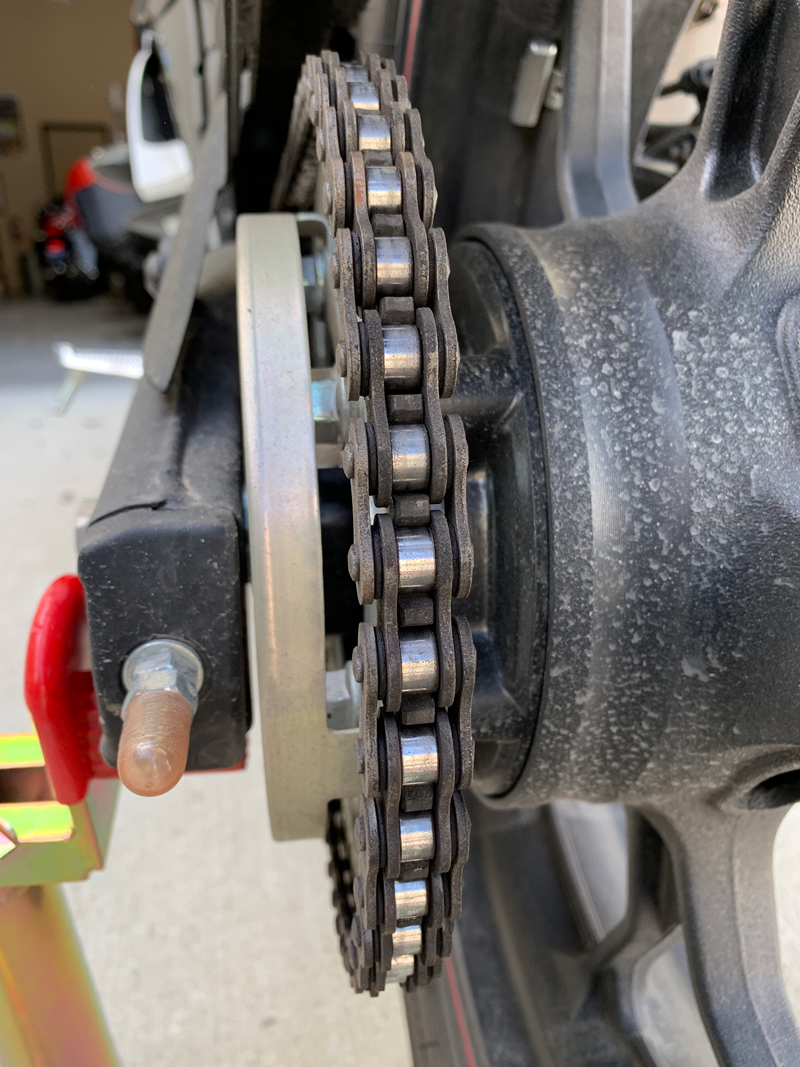
Put your moto on its centerstand if it has one, or a paddock stand if you’ve got one, so that the rear wheel is off the ground (this isn’t required, it just makes this job a LOT easier). Inspect the rear sprocket for wear. If the teeth look like little curved shark fins or if they’re straight but sharp and pointy at the ends, it’s time for a new sprocket, an easy enough job with the right tools but beyond the scope of this article. Check the chain for free play and adjust as required (your owner’s manual can guide you on this).

If you properly prepped your moto and didn’t store it outside or uncovered, especially in a humid area, the chain should be clean and free of rust. If it’s gunky or rusty, spray it liberally with motorcycle chain cleaner or plain kerosene. DO NOT USE GASOLINE as it can damage the O- or X-rings if you have a sealed chain. Wipe the whole chain with a clean shop rag, really working it to remove all the gunk/rust. A chain cleaning brush makes this part easier. If you don’t have a way to get the rear wheel off the ground, this means doing only one section at a time and rolling the bike along the garage floor/driveway to expose the whole chain.
Once you’ve done that, douse it with cleaner/kerosene again and give it a final wipe-down. Don’t rinse with water, but let it dry completely. This is a good time to clean up your work area a bit.
Next, apply motorcycle chain lube designed for your moto’s chain type. Not sure whether your chain is sealed or unsealed? Click here for our Motorcycle Chains: 101. Follow the directions on the can. Again, having the rear wheel in the air makes this a whole lot easier.
Give the rear wheel a few spins to make sure the lube covers and penetrates the chain evenly, and look for kinks or binding as it spins–that’s a sign your first ride should be to the dealer to pick up a new chain.
Alternative: check your belt
Belt-driven moto riders (which would be most cruisers), you’re not off the hook. You should still inspect your drive belt for cracks or broken teeth, and replace if necessary. Have you ever seen a belt fail at speed? I have. It ain’t pretty.
Alternative alternative: check your driveshaft for leaks
If you ride a shaft-driven bike, inspect the shaft housing for leakage, especially at the boot where it meets the gearbox. Follow your bike’s maintenance schedule as indicated in the owner’s manual for driveshaft oil replacement.
How’s your fuel?
Tools required: none
Again, properly prepping a bike for storage includes filling it with fresh gas and adding a fuel stabilizer, then running it for a few minutes to make sure the mixture gets into all the lines, injectors and carburetor (if your moto is old enough to still have one!). If you did that, you’re good to go.
If you forgot, the best thing you can do is to siphon out the old gas and put it in your car the next time you fill up (so it gets diluted with fresh stuff). If your tank isn’t full of the stale gas, you could fill it the rest of the way with fresh and you’ll likely be OK.
Change the oil
If you didn’t do this when you put it away in the fall, you definitely need to do it now. For detailed instructions on how to change your moto’s oil, click here.
Pre-ride check
Tools required:
- Riding gear!
OK, you’re almost ready to ride! Start her up and check to make sure no bulbs died over the winter: headlight (high and low beam), taillight (and brake light), turn signals and any auxiliary lights. Give the brake lever and pedal a few squeezes to make sure there’s no air in the lines. Roll forward and apply brakes to make sure everything is working as it should.
Now you’re ready to go! I’ve always preferred to make my first ride of the season a shorter one, just in case something happens (like a battery decides it’s had enough after all).
Happy riding!


The oil should actually be changed in the fall JUST before you put the bike away for the winter, not in the springtime. Used oil contains acids, and you don’t want that sitting in your crankcase eating away at your engine innards all winter long.
In an ideal world, Scott is correct. However, today’s oils and especially, today’s synthetic oils, do a pretty good job of protecting the insides of your engine, even if they’re not changed regularly or at the beginning and end of each riding season. Some of higher end oils are supposed to be able to last for 10,000 miles or so, before they’re “used up.” I dunno about anyone else, but I can’t do 10,000 miles over the course of a 5 month riding season!
Personally, I’ve gone from changing my bike’s oil from twice over the course of its storage time, to changing it before it gets put away, to changing it when it comes out of storage. I have an old 80s dirtbike that gets an oil change once every few years and I’m running conventional “cheap” oil in it. It starts up right away every spring and goes hard all summer long, until I put it away again.
If you’re that worried about what’s “eating away at your engine” while it’s in storage, send a sample of your oil to Blackstone Labs for testing, either in the spring or fall. Chances are, it’s not as “caustic” as you’ve been led to believe.
I hope you didn’t put that bike for its winter nap dirty! LOL
Haha, no, that bike was just used for the photos. Here in Southern California we don’t actually put bikes away for the winter. This one had recently been ridden in the rain, which explains its dirty state. 😛