
Shifting smoothly does more than just make you look and sound like a pro. It also:
- Makes the bike easier to handle
- Keeps the chassis loaded (and therefore stable)
- Prevents locking up the rear wheel
- Is safer, increasing the amount of time you have to provide input and have control of the motorcycle
Unless your bike is equipped with a quick shifter, shifting smoothly will require some practice. The good news is, once you’ve committed it to muscle memory you’ll be a smoother, safer, better rider.
Smooth upshifting is fairly straightforward—the key is to approach your shifts as one fluid movement rather than multiple separate actions each requiring a beginning and an end.
Here’s what we mean by that: a hard shifter first closes her throttle, then pulls in the clutch, then toes the shifter, then releases the clutch, then opens the throttle. All this happens fairly quickly, of course, but it’s not necessarily smooth.
A smooth shifter, however, starts by knowing that she needs to understand where (and what!) her clutch lever’s friction zone is. On some bikes it’s right next to the grip, on others it’s way out almost to the end of the lever movement, and on others it’s somewhere in the middle. All of your clutch’s functionality happens inside that little zone. So, for example, if your friction zone is close to the grip, you know you’ll need to have the lever pulled in quite far before anything happens. Conversely, when you release, the clutch will re-engage almost immediately.
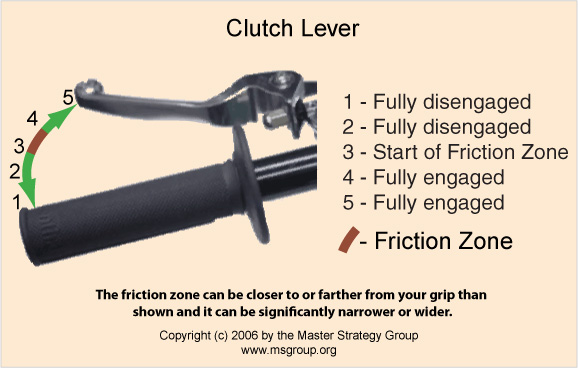
Practice Exercise #1 – In a safe, open area like a parking lot, with your bike stopped but running and in first gear, slowly let the clutch lever out until you feel the bike start to move. That means the clutch is engaging. Take note of where the lever is. Continue slowly releasing the lever, applying gentle throttle if needed to keep the bike running, until you can feel the clutch has fully re-engaged and the bike is rolling steadily forward. You’ve found your friction zone!
Now that you know where your friction zone is, you know you only have to worry about what happens inside that small area. The rest of the lever movement is just blank space—and time. Remember that as we move to the next part of the equation: the shift lever.
Slide your toe under the lever and apply gentle upward pressure—not enough to push it all the way into gear. Make a mental note of how much pressure it takes before you can feel it resist—that’s the actual shift point.
Your goal is to pull in the clutch lever and, as you approach the friction point, apply more pressure from your toe. The bike will shift into the higher gear and you can smoothly release the clutch lever, remembering where that re-engagement point is.
Of course, your throttle hand isn’t staying idle this whole time, but it doesn’t have to do as much as you might think.
When upshifting, especially when you’re accelerating rapidly such as when merging onto a freeway, you only need to close the throttle partway as you’re shifting. As you get smoother and faster with your shifting, the engine rpm won’t have time to drop and your throttle movement is minimal.
Practice Exercise #2 – On a long, straight section of pavement with little or no traffic (a big parking lot works too), keep pressure on the underside of the shift lever as you practice your clutching. Experiment with the throttle to learn how much is required to keep bike movement to a minimum. You’ll know you’ve got it when you can feel the bike smoothly accelerating with no pauses, even as you shift, like an automatic transmission car.
Now for the hard part: downshifting. The trick with downshifting is that you can’t “cheat” with the throttle and clutch quite as much as with upshifting. So let’s say you’re on a fast stretch of road and you’re approaching a tight curve. You’ve closed the throttle, pulled the clutch in to its friction point and downshifted a gear (and because of your upshifting practice you’re nice and smooth and fast). Now, you need to get the engine rpm back up so that when you release the clutch lever the lower gear will re-engage smoothly. Otherwise your rear wheel could lock up and cause a slide or what we call “rear wheel hop.” Not terribly dangerous if you’re going in a straight line, but a different story if you’re entering a corner.
There are two main approaches to smooth downshifting, what we’ll call “blipping” and “slipping.”
Blipping is a classic racing technique, where you “blip” the throttle to match the engine’s increased rpm upon downshifting. This will likely take some practice, so don’t get discouraged if you don’t pick it up right away.
As you’re letting the clutch lever back out, just as you reach the edge of its friction point, give the throttle a “blip.” The first time you try this the bike will likely give a jump—no one gets it right their very first try. So when you practice, be sure you’re on a straight, open area with no traffic or obstacles.
The trick is to eventually be able to perfectly time the “blip,” perfectly matching the engine rpm on each downshift. Hey, if it was easy everyone would be Valentino Rossi.
The second method, slipping, is easier, but slower. Rather than letting the clutch out in one quick movement, which necessitates that throttle “blip,” you buy yourself some time and slip it a little as you smoothly open the throttle. You’re feeling for that sweet spot where the clutch re-engages and you’ve opened the throttle enough that the bike smoothly picks back up where it left off.
Many newer bikes today have what’s called a slipper clutch, which does the slip work for you. In my experience, they do a pretty good job of eliminating rear wheel hop but I still like to practice increasing my throttle to match the rpm. It’s a good skill to maintain simply for smoothness’ sake!
Have some smooth shifting tips or tricks that you want to share? Comment below, or send us an email at jsmith@ridermagazine.com.


